How To Punch Holes in Leather

Leatherworking is more than just a hobby; it’s an art form that brings together precision, patience, and creativity. 

Crafting leather items is incredibly rewarding, especially when you achieve that polished, professional look. 

Knowing how to create precise, clean holes is a foundational skill essential for projects like belts, wallets, and handbags. This guide dives into expert tips and techniques to ensure your work not only looks beautiful but also stands the test of time.

Quick Step-by-Step Summary:

  • Choose the Right Tool: Select a rotary punch for thinner leather or a drive punch for thicker leather.
  • Prepare Your Workspace: Place the leather on a stable, protective surface like a cutting mat or wooden board to avoid shifting.
  • Mark the Hole Position: Use a ruler and awl to lightly mark the spot for accuracy.
  • Position the Punch: Hold the punch perpendicular to the leather for a clean cut.
  • Apply Firm Pressure: Use a mallet to strike the drive punch once with a strong, steady hit, or squeeze the rotary punch handles evenly for a precise hole.
  • Test on Scrap: If unsure, test on a similar scrap piece first to adjust for the correct force.

Selecting the Right Tool for the Job

Maun Leather Punch Plier

Choosing the right leather punch can make or break your project. 

Each punch has its strengths, and understanding these helps you make better decisions for different materials and hole sizes.

  • Rotary Punch: This versatile tool includes a rotating head with multiple sizes in one setup, ideal for thinner, softer materials like those used for belts or bracelets. A rotary punch can struggle with thicker leather (unless you choose a heavy-duty version, like this one from Maun), so it’s best for projects where you need adjustable sizes and ease of use. For smooth cuts, adjust the rotary’s position carefully and apply steady pressure to avoid ragged edges.
  • Drive Punch: With a single sharp cylinder and a solid handle, the drive punch excels on thicker leather or projects requiring absolute consistency. This tool allows you to control pressure with greater accuracy, perfect for sturdy, thick materials. Use it for projects like watch bands, wallets, or saddles, where each cut needs precise alignment.
  • Pricking Iron: Rather than punching through the leather, this tool marks stitching holes with precision. Essential for detailed stitching, the pricking iron is a favorite for complex projects such as handbags. Skilled crafters may use the pricking iron on one side of the leather and a stitching chisel on the other to keep stitching perfectly aligned on both sides.

Pro Insight: Premium steel tools are a worthwhile investment. Lower-quality punches dull faster, leading to uneven edges that can damage the material. Consider punches made from tempered or stainless steel, which stay sharp longer, saving time and effort on each project.

Stabilize the Leather for Accuracy and Clean Cuts

Stabilizing the leather before punching is vital for accuracy. 

Leather’s natural flexibility can cause it to shift, leading to misaligned holes (source). To avoid this, place the leather on a sturdy surface, such as a cutting mat or wooden board, ensuring it lies flat.

Precision Projects: When working on projects that require multiple holes in exact positions, take the time to pre-measure and mark each spot. Here’s a process professionals rely on:

  1. Mark with Precision: Using a ruler and an awl, measure each point carefully, especially when holes will hold hardware or stitches. A subtle, light mark ensures no unwanted indentations appear.
  2. Keep Alignment Consistent: For projects where alignment is key, such as belts or adjustable watch bands, even slight misalignment will be noticeable. Use a grid ruler or template for rows of holes to maintain even spacing.
  3. Hold Firmly: While using the punch, hold it steady and perpendicular to the leather surface. Tilting or wobbling leads to uneven edges or incomplete cuts, making this step essential for a professional finish.

Pro Tip: When working with thin leather that tends to shift, double-sided adhesive tape on the back can temporarily hold it in place without leaving residue.

Mastering Pressure for Different Leather Types

Leather varies greatly in thickness, density, and flexibility, affecting the force needed for a clean cut (source).

Over time, leatherworkers develop a sense of the right pressure for each type, but here’s a breakdown to help you start:

  • Thicker, Dense Leathers: For tough hides like vegetable-tanned leather, a strong, confident hit with a mallet is necessary. With a drive punch, one solid strike is better than multiple lighter taps. This technique ensures a clean edge without “fuzzy” leather strands left in the hole.
  • Softer, Supple Leathers: Thin leather or suede requires a gentler approach to avoid distortion or tearing. For these types, a rotary punch, with a gentle squeeze and even pressure, works best. Placing a thin piece of cardboard underneath gives the punch something to press against, keeping the leather from warping.

Real-World Application: Imagine crafting a wallet with a row of eyelets. Each hole must be the same size and depth for the eyelets to fit securely. Testing punch pressure on a scrap piece helps you find the right force, avoiding accidents on the final project.

Maintaining and Sharpening Your Tools for Longevity

A dull punch not only leads to frustrating results but can also damage the leather, causing uneven or ragged holes. 

Regular sharpening is essential for quality work. Here’s how to keep tools sharp and ready:

  1. Sharpening Stone: Use a fine-grit stone to carefully hone punch edges. Circular motions help maintain the punch’s original shape while restoring sharpness.
  2. Stropping: After sharpening, use a leather strop with polishing compound to refine the edge. Stropping removes any burrs that could snag on the leather, bringing the edge to a mirror finish for smooth cuts.
  3. Preventing Rust: Clean and dry tools after each session. A light coat of machine oil on steel tools prevents rust, which can dull edges over time.

Expert Insight: Avoid over-sharpening, as it can change the punch’s shape and make it less effective. Aim to restore the edge without thinning it too much, preserving both tool effectiveness and hole quality (source).

Advanced Techniques for Multi-Hole Projects

Projects requiring multiple holes demand precision and patience. 

For instance, belts or items with adjustable straps need exact hole placement to avoid noticeable variations. Here are expert strategies for handling such projects:

  • Use a Template: When creating a line of evenly spaced holes, a custom template or hole spacing ruler helps maintain alignment. Templates allow you to mark holes and test spacing before making cuts, reducing risk on your final piece.
  • Consider Hole Reinforcement: Repeated stress can cause holes to stretch, especially near edges or hardware. Experienced crafters reinforce holes experiencing regular strain by adding a second leather layer, backing with fabric, or waxing the edges to protect against wear.

Pro Insight: For greater durability, use metal eyelets or rivets in high-stress holes. They not only add strength but also lend a polished look to the final piece.

Real-World Example: Suppose you’re making a leather dog collar with adjustable holes for a buckle. Each hole needs to prevent slipping and withstand daily use. Reinforcing holes with eyelets and taking time to measure ensures the collar won’t stretch or wear unevenly, keeping it secure for years.

Understanding Leather Types and Punching Techniques for Each

Leather comes in various types, each with unique properties influencing the punching process. Knowing the leather type ensures you’ll apply the right force and tool.

  • Vegetable-Tanned Leather: Dense and holds its shape well, this leather is ideal for detailed cuts and uniform holes. Its firmness makes it a top choice for tooling and dyeing. A drive punch creates crisp, well-defined holes on this material.
  • Chrome-Tanned Leather: Softer and more flexible, chrome-tanned leather needs a different approach. Its flexibility can lead to tearing if the wrong tool is used. A rotary punch with a steady squeeze preserves its shape and prevents fraying.
  • Oiled or Waxed Leather: Stretchy, with a slightly slippery surface, oiled leather needs a stabilized work area. Use a slightly larger punch than usual, as the leather may expand slightly. The additional space prevents tight fits that could lead to tearing.

Pro Tip: Keep small scraps of each leather type on hand to test punches. This practice refines your technique and ensures you don’t risk your main piece with untested methods.

Summary

Punching leather professionally involves more than selecting a tool and applying force. By mastering tool selection, stabilizing techniques, pressure control, regular maintenance, and type-specific approaches, you’ll achieve holes that are uniform, clean, and structurally sound. 

Every leather project tells a story, and these advanced techniques ensure that each piece not only looks polished but also lasts longer, reflecting your craftsmanship and dedication. Savor the satisfaction of crafting with precision, and watch each project become a testament to your skill.

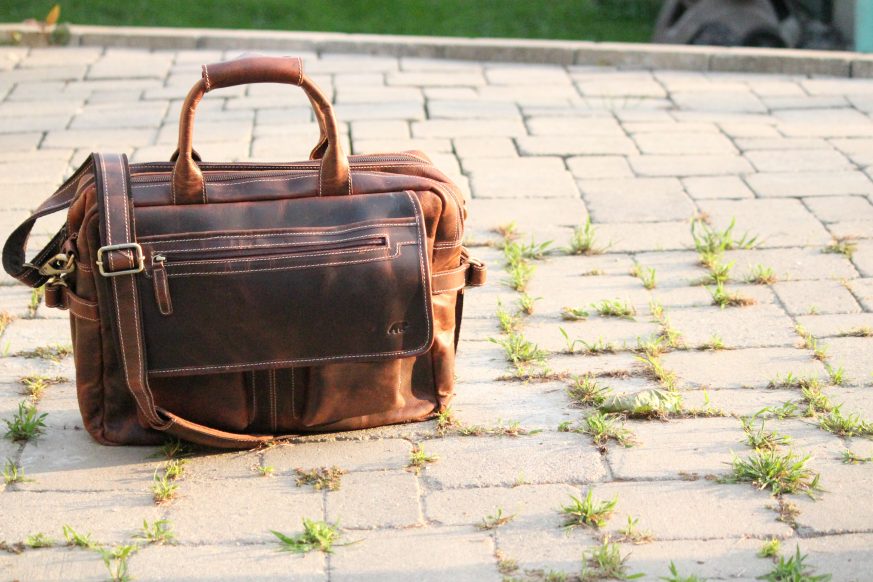
 

Kodiak Leather Buffalo Leather Pilots Bag- $249

A quality and stylish briefcase is a real attention grabber and is a key element to a fashionable men’s and women’s wardrobe. Briefcases can hold the minimal – laptop and a few folders or the carry all – books, tech, folders and even cloths as an indispensable travel companion. 

Kodiak Leather’s Pilot Bag seems to fit the bill for both office and travel in its style, function and durability. 

About Kodiak Leather Co.

Kodiak Leather Co. of Utah is a startup in Lehi, Utah founded by Jared Morse, an outdoorsman who was frustrated by the lack of reasonably priced leather bags that would hold up through all the wear and tear of daily use. This inspired Jared to create Kodiak Leather Co. and our custom leather bags. After finding only the highest quality leather and hardware, he set out to build a bag that would last a lifetime.

Fast Forward 4 Years…
 
After having 4 successful Kickstarter campaigns, the Buffalo Leather Satchel, The Classic Weekender Duffel, the Sitka Leather Messenger, and the most recent Yukon Garment Bag,  they have come full circle on offering a wide variety of travel bags , briefcases (similar to the satchel and the messenger), as well as some smaller, everyday carry items like journals and wallets.
 

Construction

The Pilot Bag is made from a thick top grain buffalo leather and a high grade thread. Premium brass hardware and YKK zippers are used in the bag.

The bag is available in 2 leather finishes: antique brown and dark walnut (pictured). The dimensions of the bag are 5 “deep x 18″ length x 14″ height. The bag has 2 zippered exterior pockets and 2 pouch pockets with a magnetic snap closure. Behind the flap that covers the pouch pockets there is a pocket that has a velcro tab to keep it closed.

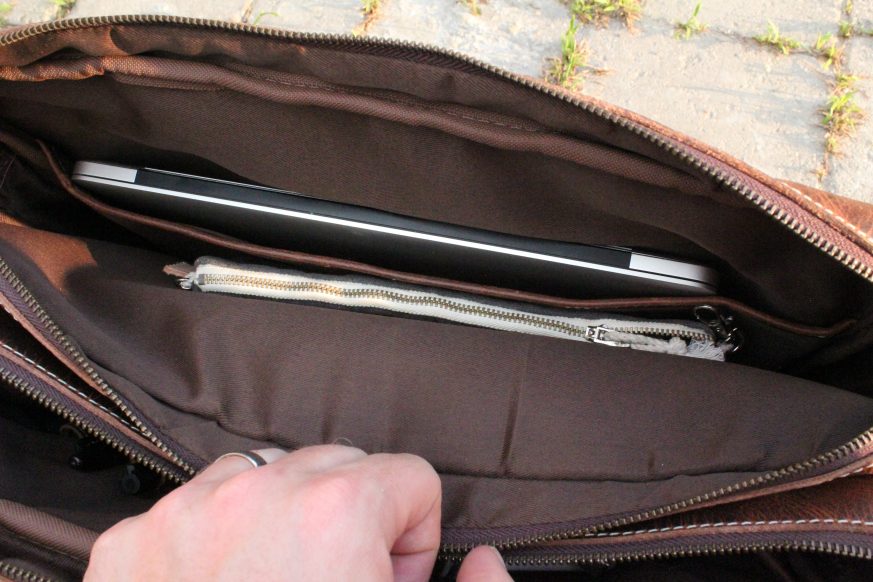
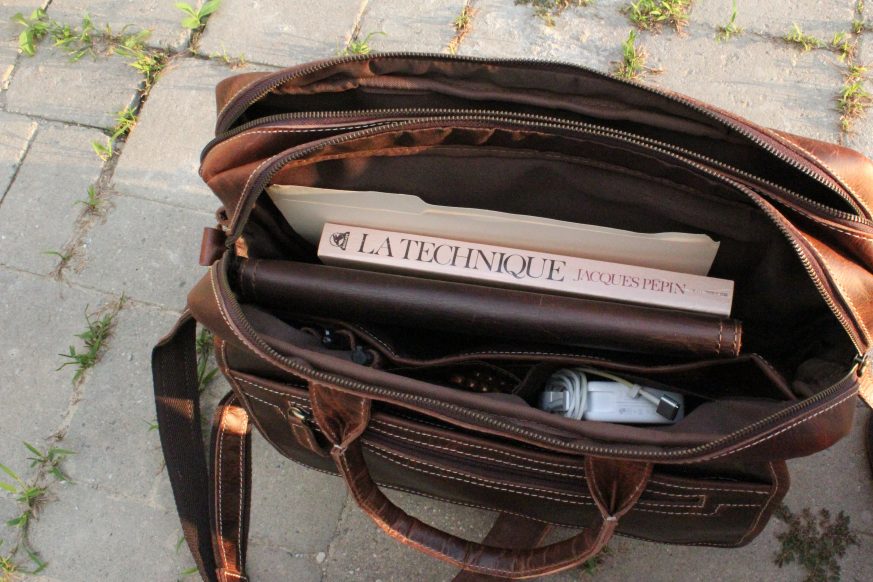
There are 2 zippered main compartments with a laptop pocket and dividers. There are also interior side slots for cards, a device pocket and 2 pen holders.

The interior of the bag is lined with a dark brown fabric liner. On the sides of the bag is a strap and buckle system to cinch in the bag.

The removable strap is a combined use of quality nylon and leather. In addition to the removable strap there are two regular top handles with a 2 snap closure.

Function

This bag can easily serve as your carry all office and travel companion to hold a laptop, cords, accessories, books, folders, clothes, and even camera gear. The outside pockets and flaps make ideal spots for wallets, passports, keys, passes, newspapers and other small gear to place in while traveling. Heck, having a newborn son, I would even consider it as a very convenient and classy baby bag that could make many other dads envious.  

Aesthetic

The buffalo leather used for this bag is soft and lightweight and has a very stunning antique distressed finish. The zippers, as stated above, are of high quality making it easy to zip and open when full. Although some many prefer more buckled hardware as opposed to the magnetic snap closures on the front pocket, I appreciate the convenience of getting in and out of the pockets quickly. I’m not a huge fan of the velcro tab in the front pocket but understand why it was put there. I see the velcro wearing out in time but it is a very small detail that does not bother me in the grand beauty and construction of the bag. 

The bag overall has a great feel to it when carried with the snapped handle or the shoulder strap. The weight is evenly distributed and as mentioned before, is not super heavy like a lot of leather bags on the market. I feel confident in saying that my shoulder and back will not suffer if carrying this bag for a longer period of time (unless of course you have very heavy cargo).

Conclusion

Let’s be real- most leather briefcases come with a hefty price tag. Understandably so given the materials and labor that goes into making them. What I am very impressed with about this pilots bag and all of Kodiak Leather Co. products is a very fair price that does not, in my opinion, sacrifice the quality or integrity of the product. The Pilot Bag is a welcome addition to my leather bag collection and one that I look forward to using for many years and handing down to my son. Check it out this bag -here- as use code: ‘ABANACH20’ to receive a generous discount for taking the time to read this review!

How to Care for your Leather Luggage

In this blog post, we speak to Kaehler1920, a family based business from Chicago with a reputation for manufacturing the finest leather bags, cases and luggage. Founded in 1920, the Kaehler tradition combines true craftsmanship with locally sourced materials to produce leather goods of the very highest quality. As a long respected voice within the industry, here they show us how best to care for your valuable leather luggage to ensure it’s ready for the road and will stand the test of time.

Elegant, timeless, and practical – leather has always been a firm favorite of luggage manufacturers. In fact, leather was a key material used within the construction of the archetypal suitcase, a design intended to replace the unwieldy trunks that were popular during the early days of tourism. Chosen for its ability to provide just the right balance between durability and desirability, leather remains as glamorous today as it was in the 19th century, with the years only adding to the glorious patina of this material’s well worn path.

Today, leather luggage is increasingly in demand, particularly as vintage trends persist, and well cared for cases are passed down from generation to generation. And this final point is key: a carefully crafted, lovingly maintained, and regularly cleaned leather bag or suitcase should last, not only your lifetime, but also that of your children and possibly even grandchildren. With this in mind, we look at how best to clean, condition, and care for your beloved leather cases to ensure they provide you with many years of service.

The Three Cs – Clean, Condition, Care

Looking after leather in any setting doesn’t need to be overly difficult, and there’s certainly no need to be intimidated by the process, even if your luggage is expensive. In fact, caring for your leather luggage can be split into three simple stages that should cover everything you need to keep your leather looking great.

Firstly, a word on materials. You will probably find that most pieces of travel luggage are crafted from leather using a vegetable tanning process. Other tanning processes – including chrome tanning and re-tanning – yield different results and are used to give the leather different qualities. However, you will find that caring for your leather bags is much the same whatever type of leather used, with just a few things to be aware of during the lifetime of your product.

Cleaning Your Leather Luggage

Cleaning your leather luggage should done on a regular basis, forming the largest part of your leather care routine. It is also the simplest part of caring for your leather luggage, requiring only the removal of dirt and dust with a cloth, warm water, and a liquid cleaner suitable to the type of leather your bag is made from. This should be complemented by wiping away any dust with a soft cloth once or twice a week, helping to preserve your leather and develop a unique patina.

Additionally, you should take note of these points when cleaning your leather bags and luggage:

  • Always take care of stains as soon as possible. Don’t let them soak further into the leather grain where they may be harder, or even impossible to remove at a later date.
  • Be careful to avoid buckles, straps, buttons and other hardware. It’s possible that these could be tarnished by whatever cleaner you are using.
  • Rub away stains and dirt with light pressure. If you begin to press too much you may remove the finish and damage the underlying leather.

Conditioning Your Leather Luggage

Conditioning your leather luggage should also be done on a regular basis, although not as frequently as cleaning. This will ensure the leather does not dry out over time. There are plenty of off-the-shelf products on the market designed to be used on specific leather types, including mink oil and neatsfoot oil. However, recipes containing natural oils such as orange, cedarwood, and citronella can also be used, plus they have the additional benefit of helping to remove strong leather odors on new bags. It is important to allow these oils to dry thoroughly before you wipe off any excess. After conditioning the leather, it is also a good idea to weatherproof your bags using something like beeswax cream.

Additionally, be aware of these points when conditioning your leather luggage:

  • Olive oil also makes a great conditioner, and plenty of recipes include it as a core ingredient. However, recently the use of natural oils on leather has become controversial, so take some time to do a little research before you commit
  • Always spot-test any DIY recipes – preferably on the inside of the bag – before you commit. That way you can be sure not to damage the leather.
  • Work slowly and methodically with a soft cloth to ensure equal amounts of whatever you are using is worked into the grain of the leather for even coverage.

Caring for Your Leather Luggage

A core component is of the 3 Cs is the general, everyday care of your leather. For instance, while not regular occurrence, any scratches to the leather must be dealt with quickly – otherwise the underlying leather could become damaged and compromise the integrity of the whole bag. Storage is also important, and if your bag is packed away for any length of time then you must make sure is neither too dry or too damp. Remember also that leather is a natural material and, while it might look fantastic, that trip to the arctic circle to experience the Northern Lights might not be the best idea considering the weight and water permeability of your bag.

Here then, are a few final points to remember when caring for your leather luggage:

  • Avoid temperature extremes at all costs, both heat (including direct sunlight) and cold (below freezing point) can damage the leather of your luggage irreparably.
  • Store in original packaging where possible and include a handful or rice (or the original silica bag) to remove any moisture. Additionally, pack the bag with unprinted paper (not newspaper) to maintain its shape.
  • If your bag becomes wet or waterlogged, always allow it to dry naturally and never use a heat source to speed up the process

Caring for Your Leather Luggage – Final Thoughts

Naturally, there are as many pieces of advice on how best to look after your leather as there are pieces of luggage traversing the globe. However, we hope that these simple rules will help guide you on your journey in the proper care of your bags and cases. And remember, a well cared for piece of leather luggage is a great way to pass down your memories to your kids and grandkids, so make sure you take your time to do it right.

Leather 101: Caring for Leather Furniture

Hello BestLeather readers! I’m Chris Repp, a second-generation leather restoration professional and the creator of LeatherHelp.com. I’ve spent 25 years cleaning, repairing and restoring leather furniture, automotive leather interiors, leather jackets, bags, yacht cabin leather and private aircraft leather seating. More often lately, I’m training others to do the same.

While you are a sophisticated audience here at BestLeather, I am a blue-collar leather guy. I don’t have a degree in leather technology or a comprehensive knowledge of the many types of leather tannage. In fact, I tweeted out the other day that I learn something new every time I visit BestLeather. It’s true.

What I will give you today is insight born out of 1000’s of living-room discussions with my real customers over the decades. The result has been lots of practical advice on:

  1. Choosing the right leather furniture for you,
  2. Caring well for that leather furniture so it lasts a lifetime
  3. Dealing with the inevitable leather problem.

So here’s 25 years of advice in short.

Choosing leather furniture

  • Buying quality leather matters most – For a leather restoration guy, I say no to a lot of leather jobs. Mostly because the people bought cheap, junk leather or faux leather and I can’t fix it for them. So my first piece of advice is buy good leather from a knowledgeable furniture retailer or none of the rest of this advice will matter. It’s only lipstick on a pig.
  • Leather furniture for active families – Lots of my customers ask, “I have small kids and we have pets, should we get leather or not?” I say, “Certainly”, but then I point them back to my first piece of advice. If you buy cheap leather, the family will tear it up in no time. If you buy quality, I can teach you how to care for it and it will last for decades.

Investing in leather barstools can add a touch of sophistication to your space. When caring for leather furniture, it’s crucial to follow proper maintenance routines to ensure the longevity and beauty of your barstools.

  • How much should you spend and why – For most consumers, I recommend mid-grade, mid-priced leather furniture from a good furniture or leather retailer. Spend more than you initially wanted to but not enough to break the bank. Heres why: Cheap leather from a warehouse is obviously going to be a mess in no time. But on the other end of the spectrum, the highest grade aniline (unprotected) leather sofa is beautiful and butter soft but very delicate and may not be appropriate for most buyers. I’d talk to a good salesman about investing in a mid-grade, top-grain finished leather. A mid-grade pull-up or distressed leather can also be a great choice if you like a leather that will distress and patina with age.

NLS_LeatherCouch


Caring for your leather furniture

  • Tips for cleaning your leather furniture – Some of these tips may sound elementary, but I’m just telling you the facts. These are tips I give because I get customers learning the hard way all the time!
    • Don’t use Windex, Simple Green or anything not made to clean leather. Only use cleaners made for leather.
    • Apply the cleaner to a soft, t-shirt material type cloth, not directly onto the leather. Clean an entire section at a time from seam-to-seam.
    • A good maintenance routine is:
      • Weekly – Dust off the leather with a dry cloth or soft-brush attachment to a vacuum cleaner.
      • Monthly – Clean the leather with a good leather cleaner
      • Quarterly – Condition the leather
  • Keys to conditioning your leather furniture – Most customers have the best of intentions but aren’t going to follow the rigorous routine above. So I suggest that they at least use a cream conditioner on their leather twice a year. However, if I see a fireplace or lots of direct sunlight in the home, I will urge they do the 4x conditioning a year. Dry heat will dry out leather if not treated. The final common suggestion I offer for conditioning applies to pull-up leather furniture. Pull-up leather has been “stuffed” with wax. After a few years, that wax comes off the seats and arms of the furniture. In that case, I suggest they get a thicker wax-paste conditioner and wax the leather almost like you would wax your car. Then I suggest waving a warm hair dryer over the wax to set it into the leather.
  • Unexpected household items can damage your leather furniture – I get calls each week from customers who just noticed a big discolored spot on their leather sofa. Once we trace it back, we discover it often is caused by a normal household chemical that they never guessed could take the color out of the leather. Here are several culprits I get all the time: Instant hand sanitzer, Dog flea and tick medicine, skin creams, hair gel or ointment, Windex, wood furniture polish, nail polish remover, and hot surfaces such as mugs or hot plates. All these items can easily remove finish from even a good quality leather furniture.

NLS_Touching_up_edges

Dealing with damaged leather furniture

  • What damages can be repaired – If you are planning to keep your new leather furniture for decades, it is inevitable that something may go wrong. No matter the damage, re-upholstery is always a possibility. The challenge with upholstery is to find a color and grain pattern that match. The cost of upholstery can be prohibitive, so it’s important to check if it can be repaired before spending too much money. My expertise is in leather repair, so I’m familiar with type of damages that can be repaired: Scratches, cat scratches, dog scratching, transit scuffs, stains of all types, discoloration, punctures, small tears usually less than 2”, sun fading, normal wear and tear, ink stains and surface cracking. I’ve seen them all, and a good leather pro in your area can repair them so they are almost like new.
  • An easy DIY cut repair video – My claim to fame on YouTube is a video I made late one night that teaches you how to fix a simple straight cut in your leather furniture. Watch the video here.

full size half done

Save money by hiring a leather repair pro

As a leather repair pro I have to make a pitch for our trade. So, here are a few ways you can hire a good leather pro to solve leather problems and save you some money:

        • Restoration is a great, green alternative to replacing 5-10 year old leather furniture. The frame, the cushions and even the leather itself are often in great shape. Only the leather surface needs cleaned and spruced up for a leather set to have decades more use in int. This usually costs 20% of replacement.
        • Restoration is a often a great alternative to reupholstery- For the more minor damages I described above, restoration is a cost effective alternative to reupholstery. I know many upholsters and they do great work, but will readily admit it can cost just as much as replacement. Restoration is less and can often be done in one day in your home.
        • Check around online or in your local classified ads and buy a gently used but quality leather sofa. A good pro can restore it for you for 20% of the cost of new.
        • Color change is an option for those who still like their leather furniture style but could update the color scheme in a room. This usually costs about half the price of a replacement set.

So that’s it, a small slice of my best stuff to help you choose and care for your leather furniture for a lifetime. I’ll admit leather furniture that lasts a lifetime is not the norm these days. I’ve seen some leather 10, 5, heck even 2 years old that is a mess already. I hope my experience and advice will help you be the exception!   There’s nothing like having a still beautiful leather sofa that’s 20 years old and has served you through decades of life memories.


Chris Repp is a second-generation leather restoration professional and the creator of LeatherHelp.com. You can sign up for his newsletter here. Follow him on Twitter and YouTube.

Leather 101: The Different Types of Leather

Leatherworking has been around for as long as man has been eating meat. It’s an old craft with lots of tradition and terminology. This makes learning about the leather craft a whole lot of fun, but it can also make it confusing for consumers. When buying leather products, you want to make sure you know what you’re paying for. This often means wading through the marketing and learning some of the common terminology when it comes to different types of leather.

About Cowhide

A cow, if you’ve never happened to see one, is a pretty big animal, so it has thick skin, and a lot of it. A whole cowhide is quite thick, and generally too thick to be useful for everyday leather products. So it’s usually cut down to be thinner and more useful for different purposes. (You can learn more about this from our last Leather 101 topic: Measuring the Thickness of Leather).

Cowhide is made of two main integrated layers – the corium and the grain. Collagen fibers in the corium are thinner and more flexible, and become tighter and thicker as they move up toward the grain, where the fibers are tightly packed and very sturdy. The corium becomes thicker with age, which is why calfskins are thinner, smoother and softer than the hides of older animals.

Types of Leather Grains

The top part of the grain faces outward toward the hair, and can contain blemishes like insect bites, stretch marks, scars, and brands. This means that the very top part of the grain is often buffed off to make the leather look more uniform.

Types of Leather

  • Top grain
  • Full grain
  • Split leather
  • Bonded leather

When the leather is corrected in any way, it is called top grain. Leather with the entire grain intact is called full grain. Full grain leather, even though it may have blemishes, is more expensive and more sought-after than top grain leather because of its durability and longevity. Both full grain and top grain leathers are referred to as grain leather.

Among grain leathers there are three general categories: aniline, semi-aniline, and protected. Analine leathers (like Horween’s Chromexcel) are processed using soluble dyes to maintain their natural markings and texture, and do not have a surface pigment or coating. This makes them the most natural-looking leathers, but also more susceptible to scratching, fading and staining.  Semi-analine leathers (like most bridle leathers) are treated with pigments and thus conceal more blemishes and have a more uniform coating, as well as staying more protected. Protected leathers have a non-leather coating sprayed or attached to the leather as a protectant.

The bottom part of the leather, the part that is split off from the grain at the grain/corium junction, goes by many different names, and it can get really, really confusing. Many people refer to this bottom layer of leather as “genuine leather”, however, the term isn’t used consistently and is also used to mean real leather as opposed to manmade faux leathers. More terms you may see: split leather, corrected leather, embossed leather, coated leather, Suede, Napa leather (again, not a consistently used term), painted leather, and more. For our purposes, we’re going to refer to it as split leather.

Split leather can then be sliced down even thinner and used for other purposes. Often a polymer coating is applied and embossed to mimic a grain leather; however these leathers are not nearly as strong or durable. This is sometimes referred to as a finished split.

Another use for split leather is suede, which has been textured to have a napped finish. Suede is often confused with nubuck, which is a grain leather that is textured to have a similar nap finish. The difference is that nubuck is much stronger and more durable than suede, though suede’s softness and pliability make it useful for certain applications.

Bonded leather is the lowest grade of leather, because it is not really leather – just shredded leather scraps and bits reconstituted with a filler and backed with an embossed polyurethane coating. It’s very cheap, but falls apart quickly. Bonded leather is found in low-end furniture and accessories, and sometimes book binding. You may also see this referred to as reconstituted or blended leather.

An old Bible with a bonded leather cover

How to Spot Fake Leather

There are several ways to spot a grain leather mimic, where split or bonded leather is embossed to look like more durable grain leather. If the leather in question has a very uniform or monotonous pattern, it may be evidence of embossing. Artificial leather also doesn’t have a pullup effect, which is a slight color variation when grain leather is bent or folded. Painted or polyurethane layers are non porous and thus do not effectively absorb leather conditioners.

Again, a word of warning to consumers: many of these terms are not used consistently, and you can get confused easily. The most common mistake I’ve run into is the use of the term “genuine leather”. Genuine leather is most frequently used to describe low quality split leather, but to be honest, it’s a dumb word, because many people (including myself) have made the very easy mistake of assuming that the word “genuine” means the opposite of “fake.” So I’ve seen lots of leather shops use the term “genuine” in their product descriptions, in an attempt to convey the fact that they are not using faux leather. But that term just ends up scaring people off, even if they have a solid product made with decent leather.

Go out there with your newfound knowledge, but be aware that sneaky marketing terms, old-fashioned lingo, and honest mix-ups can make things difficult. So don’t be afraid to ask questions!

A Comprehensive List of American-Made Footwear

There are many reasons to buy American-made – from creating jobs to reducing your carbon footprint to enjoying safer, higher-quality products. We’ve compiled a list of footwear brands that are manufactured right here in the US of A. Several of the companies below do not manufacture their entire product lines in the U.S., but we’ve linked to their American-made lines.

Made in America Cover

Alden – Men’s dress and casual shoes made in Middleborough, Massachusetts.

Allen Edmonds – Men’s dress and casual shoes made in Port Washington, Wisconsin.

Anbu Safety  – one professional leather safety shoes manufacturer and supplier, mainly produce leather work shoes and work boots.

Aurora Shoe Company – Men’s and women’s casual shoes made in Aurora, New York.

Bates Footwear – Men’s and women’s military and uniform shoes and boots. Select styles made in Big Rapids, Michigan.

Beck – Men’s and women’s cowboy and work boots. Made in Amarillo, Texas.

Belleville Boot – Men’s and women’s military and law enforcement boots and shoes. Made in Arkansas.

Broken Homme – Men’s casual boots and shoes, made in Los Angeles, California.

Brooklyn Boot Company – Men’s casual boots and shoes, made in Martinsburg, Pennsylvania.

Chippewa – Men’s and women’s casual and work boots, made in Chippewa Falls, Wisconsin.

Cobra Rock – Men’s and women’s casual boots, made in Marfa, Texas.

Cord Boots & Shoes – Men’s and women’s shoes and boots made in Atlanta, Georgia.

Cordoba – Men’s and women’s sandals handmade in Lebanon, Ohio.

Crary Shoes – Men’s and women’s boots and shoes, custom made in Portland. Oregon.

Danner – Men’s and women’s work and outdoor boots, made in Portland, Oregon.

Double H Boots – Men’s and women’s western boots. Select styles made in Martinsburg, PA.

Eastland – Men’s and women’s casual boots and shoe, made in Freeport, Maine.

Frye – Men’s and women’s casual boots and shoes, made in Marlboro, Massachusetts.

G.H. Bass – Men’s and women’s casual and dress shoes, made in Wilton, Maine.

Helm – Men’s and women’s casual boots, made in Maine and Arkansas.

Johansen – Men’s and women’s casual and dress shoes made in Gretna, Virginia.

Johnston & Murphy – Men’s and women’s dress and casual shoes. Select models made in Nashville, Tennessee.

Justin Boots – Men’s and women’s western boots. Select styles made in Spanish Fort, Texas.

Julian Boots – Men’s casual boots, made in Los Angeles, California.

Keen – Men’s and women’s work, casual, and outdoor shoes. Select styles made in Portland